In this blog post we will discover how to upload files using totaljs UI builder.

Total.js UI Builder: How to Upload Files
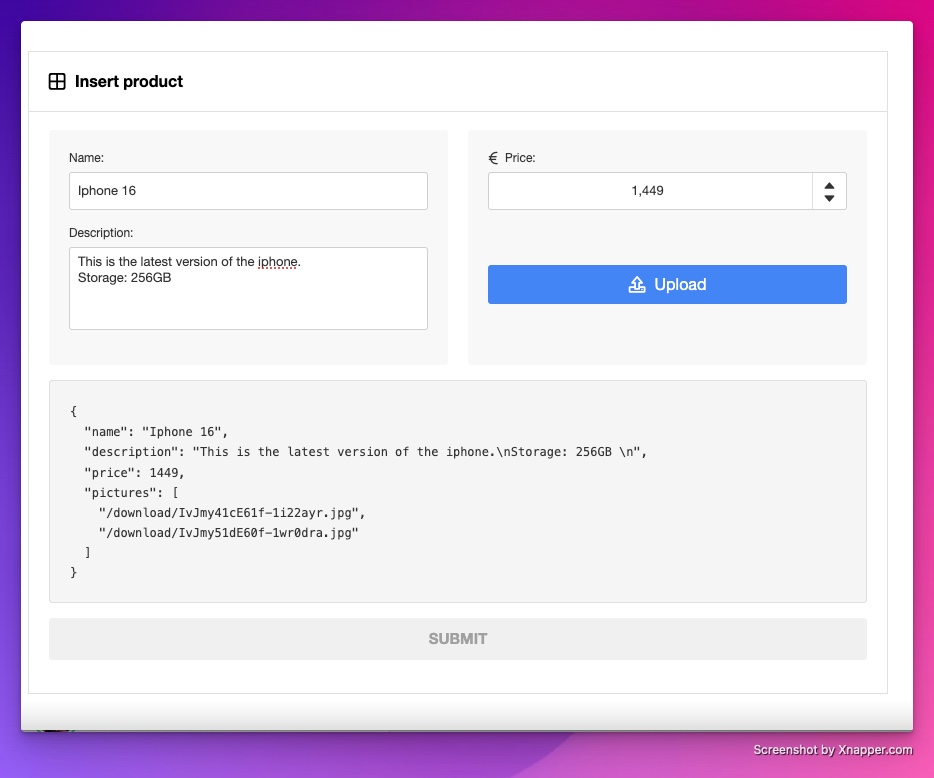
In this step-by-step tutorial, we’ll create a file upload form using Total.js UI Builder. This form can be used to insert product details, including name, price, description, and pictures. If you are new to creating forms with total.js UI Builder, you can also look into this previous blog post. Reading it is not required for understanding this blog post but it can be helpfull. By the end of this guide, you’ll understand how to use the File Uploader component, configure it, and link it to a custom upload button.
We’ll also provide a pre-built backend application (using Total.js v5) for handling the file upload. For those using other backend technologies, we’ll explain the key requirement: enabling CORS (Cross-Origin Resource Sharing) to allow file uploads from the UI Builder frontend.
Let’s dive in!
What you’ll create
The final product will include:
- Fields for Product Details:
- Name (Textbox)
- Price (Textbox)
- Description (Textarea)
- A File Uploader Component:
- Users can upload pictures with a fully functional file manager.
- A Custom Upload Button:
- Clicking this button will open the file manager for uploading pictures.
- JSON Output Preview:
- See the form's submitted data in JSON format for debugging or integration testing.
Step 1: Set up the product form
1. Add a panel component
- In the UI Builder interface, drag the Panel component from the Components Sidebar.
- Double-click the default title and rename it to
Insert Product.- This makes the panel header clear and specific.
Tip: Panels are container components that group other elements together. They’re great for organizing forms, tables, or any group of related elements.
2. Add a form component
- Drag and drop the Form component inside the Panel.
- Right-click the Form, select Settings, and leave all settings as default for now.
The form component is the backbone of your interface—it collects user inputs, validates them, and can send data to another component or backend API.
3. Add Text Fields for Product Details
- Textbox (Name): Drag the Textbox component into the Form and configure it:
- Path: Set to
name. - Type: Select
String.
- Path: Set to
- Textbox (Price): Drag another Textbox and configure it:
- Path: Set to
price. - Type: Select
Number.
- Path: Set to
- Textarea (Description): Drag the Textarea component into the Form and configure it:
- Path: Set to
description. - Type: Select
String.
- Path: Set to
Tip: Using meaningful paths likename,price, anddescriptionmakes the data structure easy to understand and work with in backend integrations.
Step 2: Adding the File Upload Functionality
1. Add the File Uploader Component
- Drag the File Uploader component into the form.
- Right-click the File Uploader and choose Settings:
- Path: Set to
pictures. - Upload URL: Enter
http://localhost:8000/upload.
- Path: Set to
The Upload URL is the endpoint where files will be sent. We’ve provided a pre-configured Total.js backend app for this purpose.
Important: If you decide to use a different backend technology (e.g., Node.js, Python, PHP, etc.), ensure that CORS (Cross-Origin Resource Sharing) is enabled in your server configuration. Without CORS, the browser will block the upload request due to security restrictions.
2. Add an Upload Button
- Drag the Button component into the form.
- Configure the button to trigger the file upload process:
- Right-click the Button and choose Settings.
- Label: Set to
Upload Pictures. - Icon: Add an upload icon for better UX.
- Input: Select the File Uploader component as the target from the dropdown list.
This links the button to the File Uploader, allowing users to open the file manager with a single click.
Note: This setup provides a clean user experience by separating the upload action (button) from the input field (file uploader).
Step 3: Previewing the Submitted Data
To debug the form and verify that it works as intended, follow the same steps as in our previous tutorial
- Add an Input Component and a To JSON Component.
- Link the Form and Input Component to send and display data.
- Open the Preview mode, fill out the form, upload files, and submit.
- Check the JSON output to confirm the submitted data structure.
Step 4: Setting Up the Backend
We’ve provided a pre-built Total.js backend app to handle file uploads. It’s fully functional, with CORS enabled out of the box.
Steps to Run the Backend
- Download the backend app from the Total.js CDN.
- Extract the zip file and run the app:
- Ensure the backend is running at
http://localhost:8000/upload.
If you’re using a different backend, refer to your framework's documentation to enable CORS. For example:
- Node.js (Express): Use the cors middleware.
- Django: Set up the
django-cors-headerspackage. - PHP: Add the appropriate headers to your response.
Step 5: Testing your form
After completing the setup, it's time to test the form and review the submitted data. Follow these steps to ensure everything works as expected:
- Click on Preview in Total.js UI Builder.
- Fill out the form fields:
- Enter a name (e.g.,
Sample Product). - Add a price (e.g.,
56). - Write a description (e.g.,
This is a sample product description.).
- Enter a name (e.g.,
- Use the Upload Pictures button to select multiple images from your file manager.
- Click Submit to process the form.
Expected JSON output
Upon submission, the JSON output should resemble the following:

Explanation of the JSON output
name,description, andprice: These fields represent the text inputs you provided in the form.pictures: This field contains an array of URLs pointing to the uploaded images. Each URL corresponds to a file successfully uploaded to the backend.
This demonstrates that the form supports multi-file uploads, which is particularly useful for scenarios like product listings where multiple images are often required.
Note: The Total.js backend app we provided is already optimized for multi-file uploads. It processes multiple files in a single request and returns their respective download URLs.
Enhance your form
Want to take it further? Here are some ideas:
- Add validation for file types (e.g., allow only images).
- Limit the number of files a user can upload.
- Provide a progress bar for file uploads.
Congratulations! You’ve successfully built a fully functional file upload form using Total.js UI Builder. Stay tuned for more tutorials to enhance your UI design and functionality!
This revised version emphasizes clarity and includes additional details for beginners. Let me know if you’d like any further adjustments!
Other posts from Total.js Platform
- 2026-02-02January report 2026
- 2026-01-02December report 2025
- 2025-12-15Totally Merry Christmas and a Happy New Year 2026!
- 2025-12-01November report 2025
- 2025-11-02October report 2025
- 2025-10-22New universal drivers for IoT Platform
- 2025-10-13IoT Platform Update: New Features and Enhancements
- 2025-10-01September report 2025
- 2025-09-05How to create Google Gemini AI component in Total.js Flow
- 2025-09-01August report 2025

