
In this post, we’ll break down what data binding is, introduce you to the <ui-bind> HTML element, and explore how it serves as the bridge between your data and the UI. We’ll also cover the essential attributes and binding commands you’ll need to master this concept.

Total.js UI #3: Data Binding (Part 1)
Welcome back to our Beginner’s Guide to Total.js UI! If you’re new to this series, I recommend checking out our previous post, Beginner Guide to Total.js UI: #02 Understanding Paths, where we covered the fundamentals of paths—an essential concept for navigating and managing data within Total.js UI.
For those who have been following along, you should now have a strong grasp of paths, which form the backbone of how data is managed and navigated in Total.js UI. With that knowledge in hand, you’re ready to delve into another core concept: Data Binding.
Data binding is what makes your UI dynamic, allowing you to connect your data to your user interface seamlessly. Whether you’re coming from other front-end frameworks like React or Vue, or you're entirely new to the idea, understanding data binding in Total.js UI will empower you to create interactive and responsive applications with ease.
In this post, we’ll break down what data binding is, introduce you to the <ui-bind> HTML element, and explore how it serves as the bridge between your data and the UI. We’ll also cover the essential attributes and binding commands you’ll need to master this concept. By the end of this post, you’ll have a solid foundation in data binding, setting you up for more advanced topics we’ll cover in future posts.
As always, a practical hands-on video version of this blog is available, guiding you through the concepts discussed here. Let's dive in!
What is Data Binding?
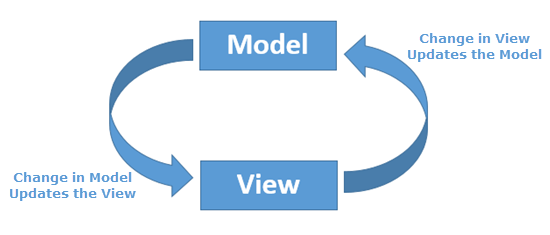
Data binding is a fundamental concept in modern web development that connects the data in your application to the user interface (UI). Imagine it as a two-way street: on one side, you have your data model, which holds the information your app needs to function. On the other side, you have your UI, which is what users interact with. Data binding ensures that these two sides are always in sync. If the data changes, the UI automatically reflects those changes, and if the user interacts with the UI (like entering text in a form), the data model updates accordingly.
This connection between data and UI is what makes applications dynamic and responsive. Without data binding, developers would have to manually update the UI every time the data changes, which would be both time-consuming and error-prone.
In front-end development, data binding is not a new concept. It’s a popular concept of frameworks like React, Angular, and Vue.js, where the flow of data between the model and the view is critical for building rich, interactive applications. Total.js UI is no different in this regard, offering its own powerful and flexible approach to data binding. As we dive into the details, you’ll see how Total.js UI makes this process both simple and effective, allowing you to build complex UIs with minimal effort.
But before we get into the specifics, let's set the stage with an essential tool in Total.js UI: the <ui-bind> element.
The <ui-bind> Element
In Total.js UI, the <ui-bind> element is the choosed by the library for binding data to your UI. Think of it as the glue that keeps your data and UI together, ensuring that they remain in sync no matter what happens. Whether you’re displaying text, handling user input, or managing complex UI components, <ui-bind> is there to make sure everything works smoothly.
Basic Usage
At its most basic level, <ui-bind> allows you to connect a specific piece of data to a part of your UI. Here’s a simple example to illustrate this:
In this example, the path attribute points to a property in your data model—user.name. Whenever the value of user.name changes, the content of the <ui-bind> element will automatically update to reflect that change. It’s as simple as that.
But <ui-bind> isn’t just limited to basic text updates. It can also react to more complex changes in your data and perform actions based on those changes. That is why the config attribute is there, to allows you to specify commands that dictate how the data should be handled or displayed.
In this setup, whenever user.name changes, the commands listed in config are executed, transforming or handling the data as needed before it’s displayed in the UI. This gives you a lot of flexibility in how you manage and present your data.
<ui-bind> Attributes
To truly benefit from the power of <ui-bind>, you need to understand its key attributes. Each of these attributes serves a specific purpose, helping you control how data is bound and how it interacts with your UI.
Path Attribute: path="your.path"
The path attribute is the most critical part of any <ui-bind> element. It defines the exact location in your data model that you want to bind to. Think of it as providing a GPS coordinate to the data you’re interested in. Whenever the data at this path changes, the <ui-bind> element knows exactly where to go and what to update.
For example, if you’re building a user profile page and want to display the user’s name, you might use:
Here, profile.username is the path to the data. If the username changes (maybe the user edits their profile), the <ui-bind> element will automatically update to show the new username.
Config Attribute: config="commands"
The config attribute is where the magic happens. This is where you define the commands that will be executed when the data changes. These commands can transform the data, control its visibility, or even trigger other actions in your application.
For instance, if you want to automatically convert the username to uppercase before displaying it, you could use:
In this case, the config attribute uses a command that converts the value (which is the username) to uppercase before it’s displayed. This allows you to dynamically control how your data appears in the UI.
Element Attribute: element="DOM selector"
While the <ui-bind> element itself is powerful, sometimes you may want to bind data to an existing DOM element instead of the <ui-bind> element. This is where the element attribute comes into play. It allows you to target a specific DOM element in your HTML, using a selector, and bind the data to that element instead.
For example:
Here, instead of displaying the username inside the <ui-bind> element, the data is bound to the element with the ID username-display. This is particularly useful when you’re working with more complex UIs where the structure is already defined.
It’s worth noting that using the element attribute with multiple elements or in combination with the child attribute is not possible. This limitation ensures that data binding remains clear and straightforward.
Binding Commands
Now that we’ve covered the attributes, let’s explore the various binding commands you can use with <ui-bind>. Binding commands are expressions or functions that define how the data should be manipulated before it’s displayed in the UI. They give you the power to customize the behavior of your bound elements in real-time.
Arrow Functions
Arrow functions are a concise way to write binding commands. They allow you to transform the data using JavaScript logic directly within the config attribute.
For example:
In this case, the arrow function takes the value (the user’s age) and appends the text ' years old' before displaying it. This makes it easy to format or modify data on the fly.
Direct Value Manipulation
If you prefer, you can also manipulate the data directly without using an arrow function. This is useful for simpler transformations or checks.
For example:
Here, the command checks if the order.total is greater than 100. If it is, the text 'High value' is displayed; otherwise, it shows 'Standard value'. This kind of logic allows you to create dynamic, conditional UIs with minimal effort.
Linking to a Method

For more complex or reusable logic, you can link a command to a method defined elsewhere in your code. This method will be called whenever the bound data changes.
For example:
And in your JavaScript code:
This setup allows you to centralize your logic, making it easier to maintain and reuse across different parts of your application.
The Show/Hide Commands
Finally, let’s talk about one of the most practical uses of data binding: controlling the visibility of elements. Total.js UI makes this incredibly easy with the show and hide commands, which you can use to toggle the visibility of elements based on data values.
Show Command: show:value
The show command displays an element only if the bound value meets a certain condition. For example:
In this example, the text 'Welcome back!' will only be shown if user.loggedIn is true. If user.loggedIn is false, the element remains hidden.
Hide Command: hide:value
Conversely, the hide command hides an element when a specific condition is met:
Here, the message 'Please log in.' will only be displayed if user.loggedIn is false. This kind of logic is incredibly useful for creating UIs that respond to the user’s actions, such as showing different options based on whether the user is logged in or not.
Watch the Video Tutorial
For those who prefer a visual walkthrough, we’ve created a detailed video tutorial that covers everything discussed in this post. From understanding data binding to implementing <ui-bind> elements and using various commands, the video will guide you step by step.
Don’t forget to subscribe to the channel for more tutorials and updates on Total.js UI and other web development topics!
By mastering these commands and attributes, you’ll have all the tools you need to create dynamic and interactive UIs using Total.js UI. Whether you're showing or hiding elements, transforming data, or binding it to existing DOM elements, <ui-bind> offers a flexible and powerful way to connect your data with your UI.
In our next installment, we'll dive deeper into advanced data binding techniques, explore more practical examples, and show you how to handle more complex scenarios. As always, there’s a video version available to guide you through these concepts step by step. Stay tuned for more!
- Total.js Enterprise: Total.js Enterprise
- GitHub: Total.js on GitHub
- Stack Overflow: Total.js questions on Stack Overflow
- Telegram: Total.js Telegram group
- WhatsApp: Total.js WhatsApp group
- Twitter: Total.js on Twitter
- Facebook: Total.js on Facebook
- LinkedIn: Total.js LinkedIn group
- Reddit: Total.js subreddit
- Discord: Total.js Discord server
- Slack: Total.js Slack channel
Other posts from Total.js Platform
- 2026-03-02February report 2026
- 2026-02-02January report 2026
- 2026-01-02December report 2025
- 2025-12-15Totally Merry Christmas and a Happy New Year 2026!
- 2025-12-01November report 2025
- 2025-11-02October report 2025
- 2025-10-22New universal drivers for IoT Platform
- 2025-10-13IoT Platform Update: New Features and Enhancements
- 2025-10-01September report 2025
- 2025-09-05How to create Google Gemini AI component in Total.js Flow